
What is Crawlability and Indexability? 10 Steps to Boost Your Site’s SEO
When you think of the first visitor to your website, who do you picture?
Most people assume it’s a potential customer, but actually, it’s a search engine crawler.
When I share this information with site owners, many don’t understand what I mean.
Here’s the thing: If Google and other search engines can’t crawl and index your website, even the best SEO practices won’t help you succeed.
So, I wrote this article to help you better understand what happens behind the scenes when you publish content on your website.
Let me start by explaining what crawlability and indexability are and how they’re connected to SEO.
What is Crawlability?
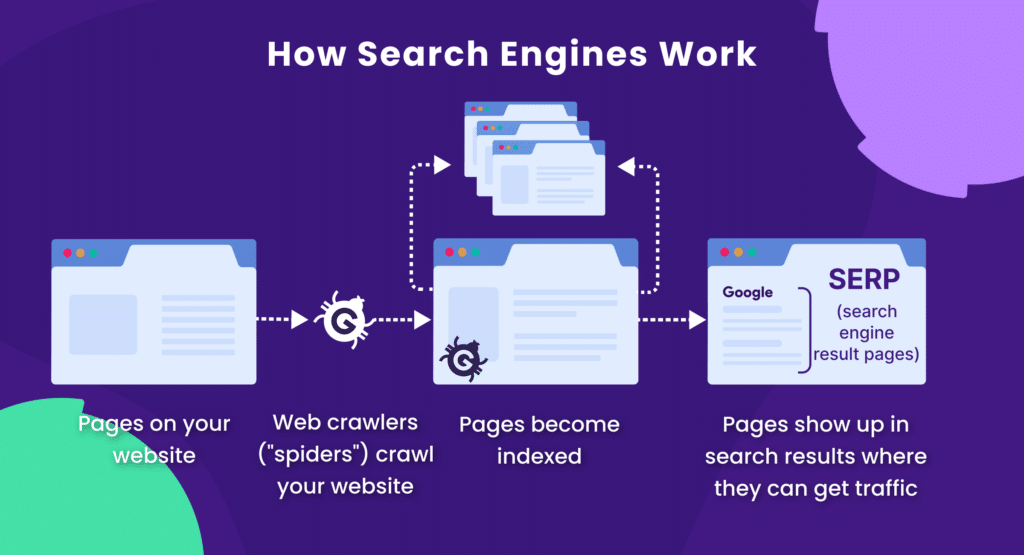
Crawlability describes how easy it is for search engine crawlers, like Googlebot, to access the pages on your site.
Web crawlers (also called spiders) follow internal links from page to page. If your website is easy to navigate, these crawlers can quickly discover and crawl new or updated pages.
Every URL on your website will go through the following steps before it can rank in search results:
- Discovering
- Crawling
- Rendering
- Indexing
- Ranking
Crawlability is essential in this 5-step process to get pages into the Google index so they’re searchable.
What is Indexability?
Indexability is the process of adding your website pages to the Google database of millions of web pages (called Google index) and making them searchable.
Once the crawling and rendering steps are completed, your web pages will be added to the Google index, making them eligible to appear in search results.
Only indexed pages can show up in organic search results!
From there, you can take steps to improve your SEO.
Why Crawlability and Indexability Are Important for SEO
If your website pages are not crawled and indexed, they won’t rank.
No ranking — no organic website traffic. That’s pretty straightforward.
If your site is closed for indexing or can’t be easily indexed, some web pages may be omitted from organic search results, making it difficult for users to find your content.
Therefore, I recommend prioritizing indexability issues to ensure all your web pages can be successfully discovered on Google.
What Factors Affect Website Crawlability and Indexability?
Most indexability and crawlability problems I’ve encountered are related to issues with robots.txt files, technical errors, internal linking, or sitemaps.
If you’re new to the more technical aspects of SEO, some of these terms might sound intimidating. So, here’s an overview of each factor to prepare you for diagnosing potential indexability and crawlability issues.
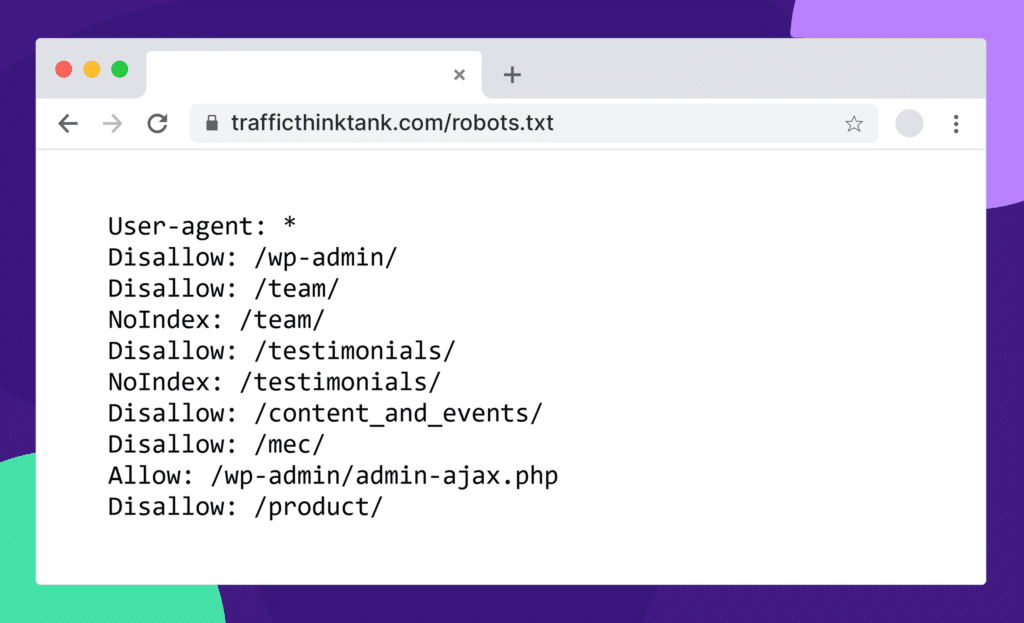
Robots.txt file
The robots.txt file is like a gatekeeper for your website. It tells search engine crawlers which pages they can and cannot access.
If you use it correctly, you can prevent web crawlers from visiting and potentially indexing some of your website pages, such as pages with sensitive information, admin panels, pages under development, test servers, and more.
However, if your robots.txt file contains errors, it can have adverse consequences for your website, including:
- An entire website can be blocked from crawling and indexing, leading to removal from search results
- Important pages won’t be accessible to web crawlers
- Pages with a “No Index” meta tag will remain indexed because web crawlers won’t be able to access the page and see the tag
What happens if you block an entire website from crawling?
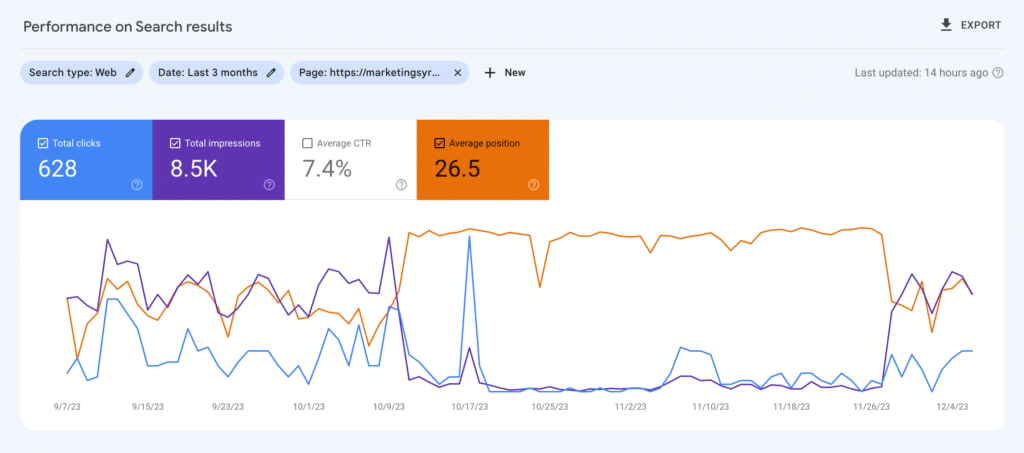
Kristina Azarenko, a technical SEO expert, conducted a crawlability test between October 5th and November 7th, 2023, where she blocked Googlebot from crawling her website.
Even though her website wasn’t fully removed from Google, its rankings declined, the favicon disappeared, and the performance of video search results significantly worsened.
As you can see in the screenshot below, the website slowly started to improve after she reopened it for crawling.
The lesson learned: Don’t mess up with the robots.txt file!
Technical Errors
Technical issues like 4xx server errors, broken links, slow page loading speed, and other errors can stop search engine crawlers from accessing your pages.
For instance, a 500 internal server error will stop a web crawler from accessing the page, while a broken internal link can lead bots to dead ends.
Have you encountered this “Discovered — currently not indexed” status in your Google Search Console report? Some pages can have this status for months and never reach the crawling and indexing steps.
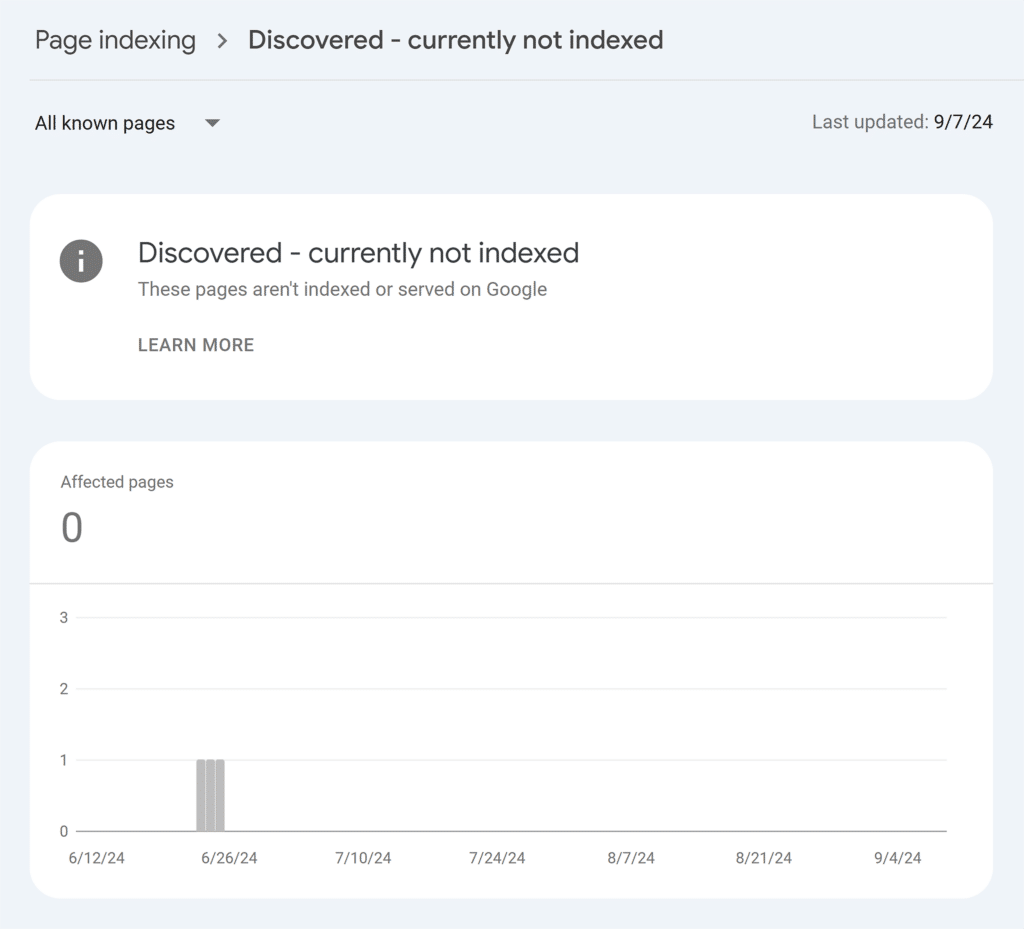
Here’s how Google explains why it happens:
“The page was found by Google, but not crawled yet. Typically, Google wanted to crawl the URL but this was expected to overload the site; therefore Google rescheduled the crawl. This is why the last crawl date is empty on the report.”
Internal Linking Problems
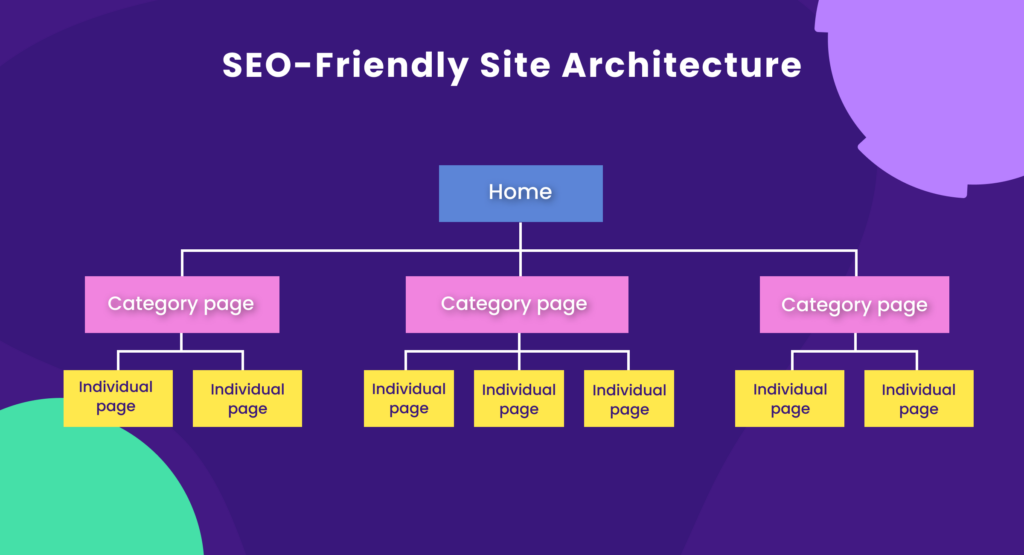
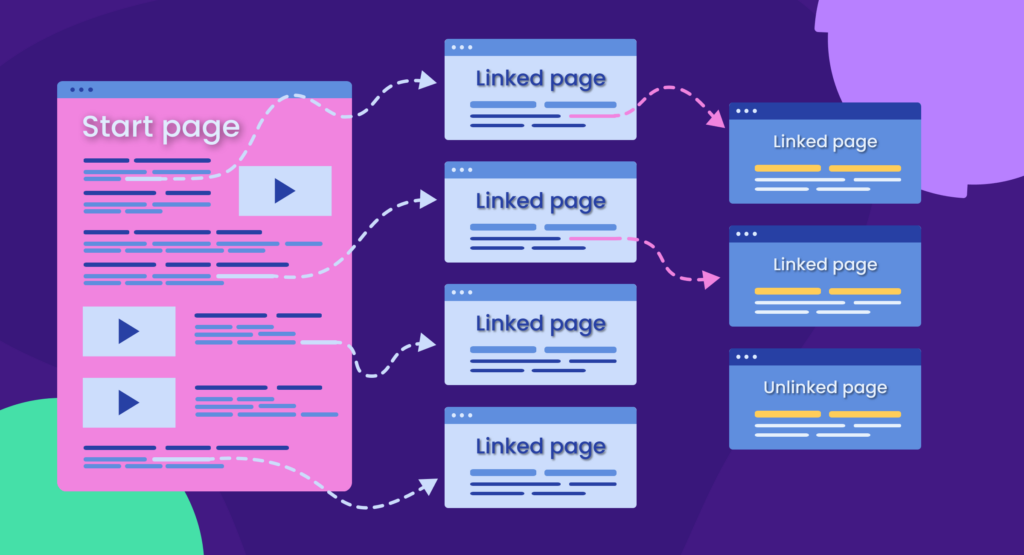
Internal linking best practices improve crawlability by providing an organized structure for crawlers to navigate and discover pages on your website.
Crawlability problems arise from confusing site architecture, orphan pages, and a lack of internal linking within your site’s content.
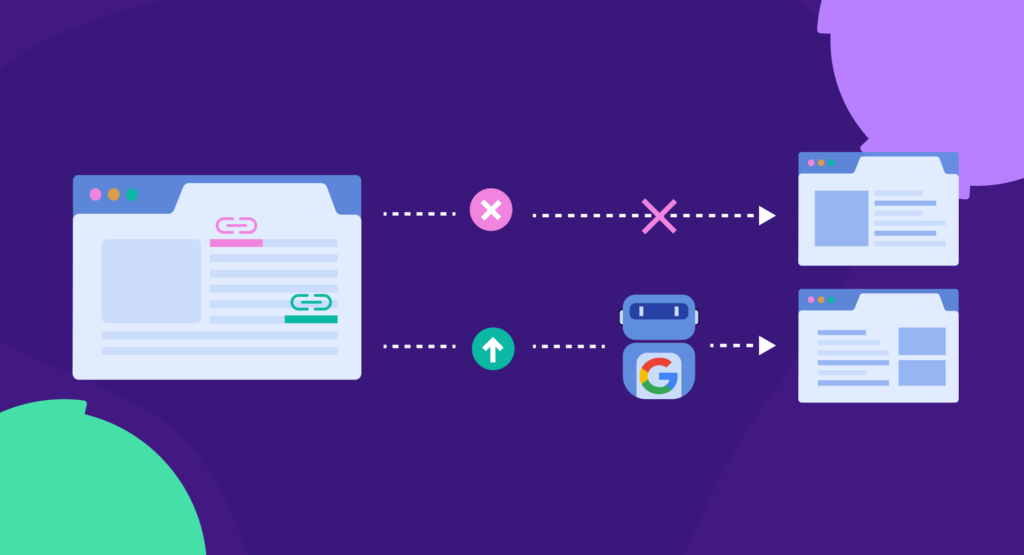
Using the wrong type of links can also limit discoverability. A nofollow attribute tells search engines not to assign any SEO value to the linked page. This is often used for sponsored links or pages you don’t want to endorse.
For example, a link with <a href=”https://example.com” rel=”nofollow”> prevents Googlebots from following it.
Using nofollow links for internal links can result in poor internal linking structure, limit the flow of link equity, and make it difficult to discover other pages on your website.
XML Sitemap
XML sitemap is like a roadmap for search engine crawlers, showing what pages of your website should be crawled and indexed.
For example, a dynamically generated XML sitemap ensures that newly added pages are quickly discovered. It’s particularly helpful for large websites with complex structures.
However, a poorly maintained XML sitemap with broken or outdated URLs can mislead search engines, waste crawl budget, and prevent important pages from being indexed.
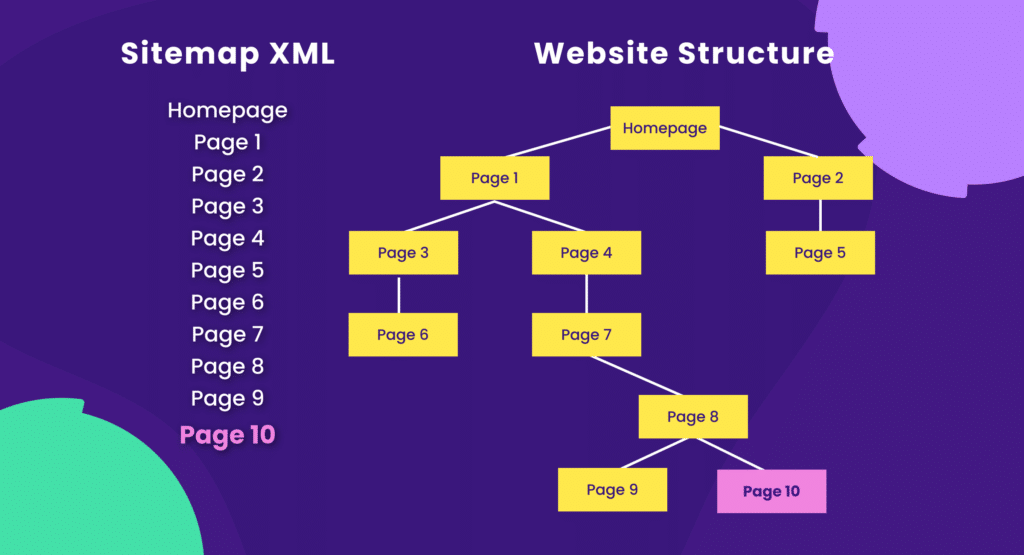
For instance, if your site has an XML sitemap, Googlebot will quickly locate and crawl page 10. However, without a sitemap and with weak internal structure and linking, Googlebot might not even discover that page. Especially if your site is new and has few external links pointing to it.
How to Check If Your Website Has Been Crawled
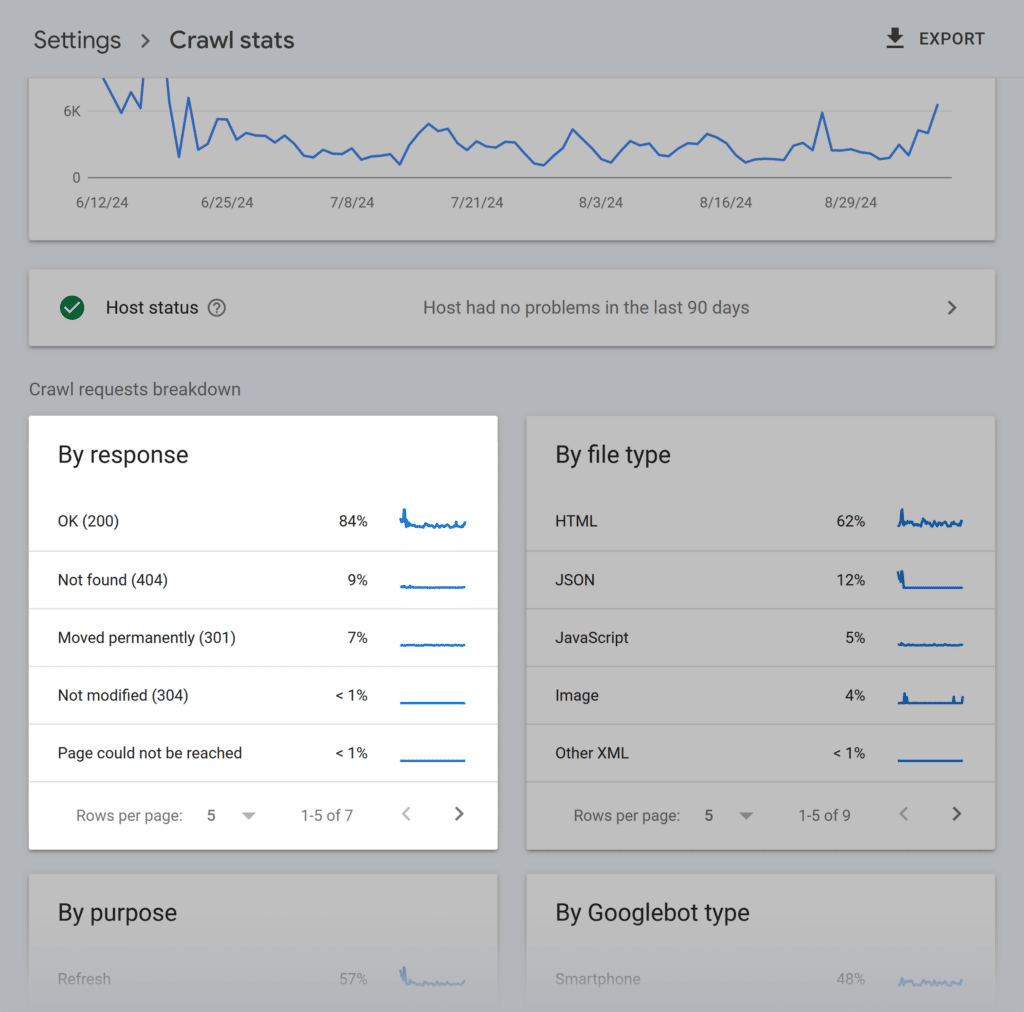
If you have a verified domain property in Google Search Console, check the crawl status report for any crawling issues.
Do you see sudden crawl spikes or lows, 4xx status codes, or any other issues? If so, it’s a sign to take a closer look at your website, as it might have crawling issues.
Alternatively, you can use SEO tools like Semrush, Ahrefs, and Screaming Frog to check your site’s crawlability.
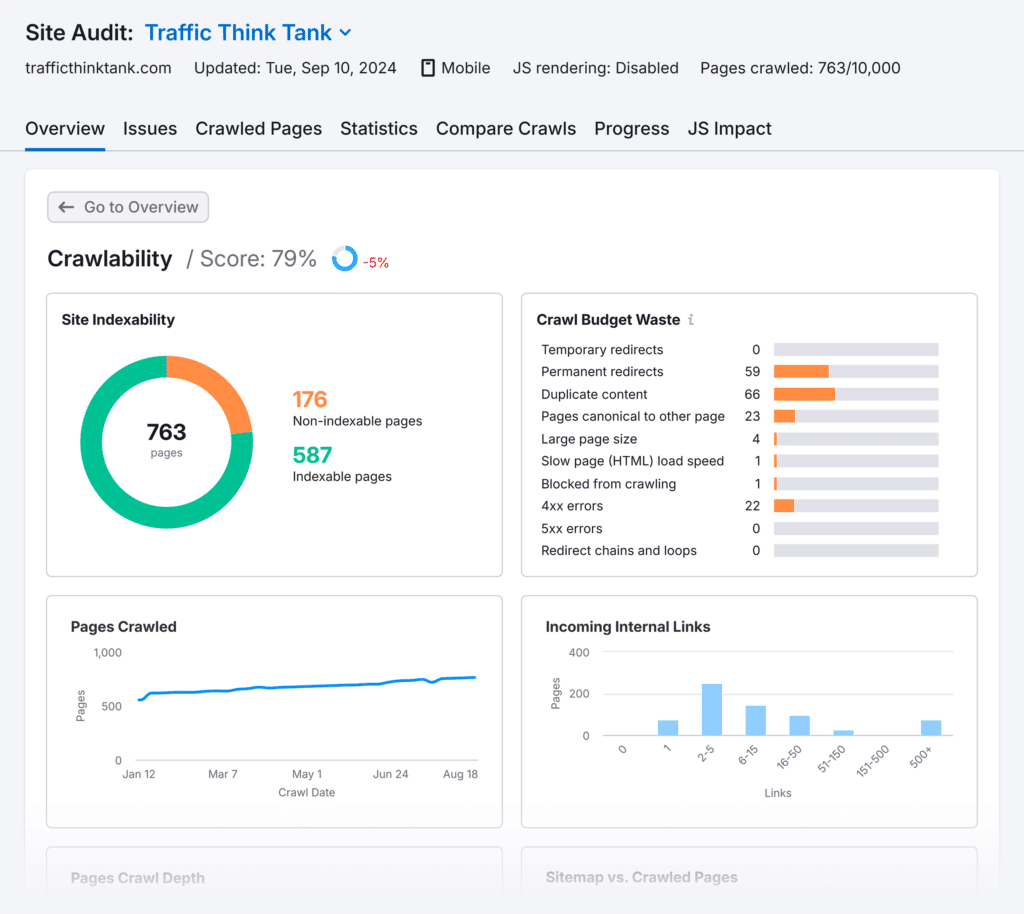
For instance, Semrush’s Site Audit tool has a crawling report.
Whether it’s your website or competitors’, it shows all crawled pages, crawl depth, page speed, and crawl budget waste.
Semrush stands out for its ability to check crawling, indexing, and other technical errors for each web page separately. (It’s one of the differences between Moz and Semrush.)
If you regularly audit your website — say once a week — you can proactively discover and fix all the issues.
Semrush helps you fix technical errors by showing hints and explaining how to fix every issue.
It’s a very convenient feature that helps you save time and manage technical issues independently from developers.
Keep in mind that the robots.txt file influences crawling behavior.
If you don’t have a robots.txt file, search engines will attempt to crawl your entire website. For many sites, this is fine. However, for larger, complex sites, this could waste crawl budget on less important pages, like admin areas or test servers.
I recommend having a robots.txt file to guide search engine crawlers, especially for larger sites. However, be cautious when implementing it – incorrect use can accidentally block important content.
Important: Don’t disallow JavaScript and CSS in your robots.txt file. Google needs access to these to render and understand your content properly. Blocking them could lead to Google flagging your pages as non-mobile-friendly.
How to Check If Your Website Has Been Indexed
If your web page is indexed, it’s eligible to appear in search results.
However, indexing doesn’t always happen automatically. Therefore, you should occasionally check your website indexing to ensure new web pages are added to the index while old pages remain searchable.
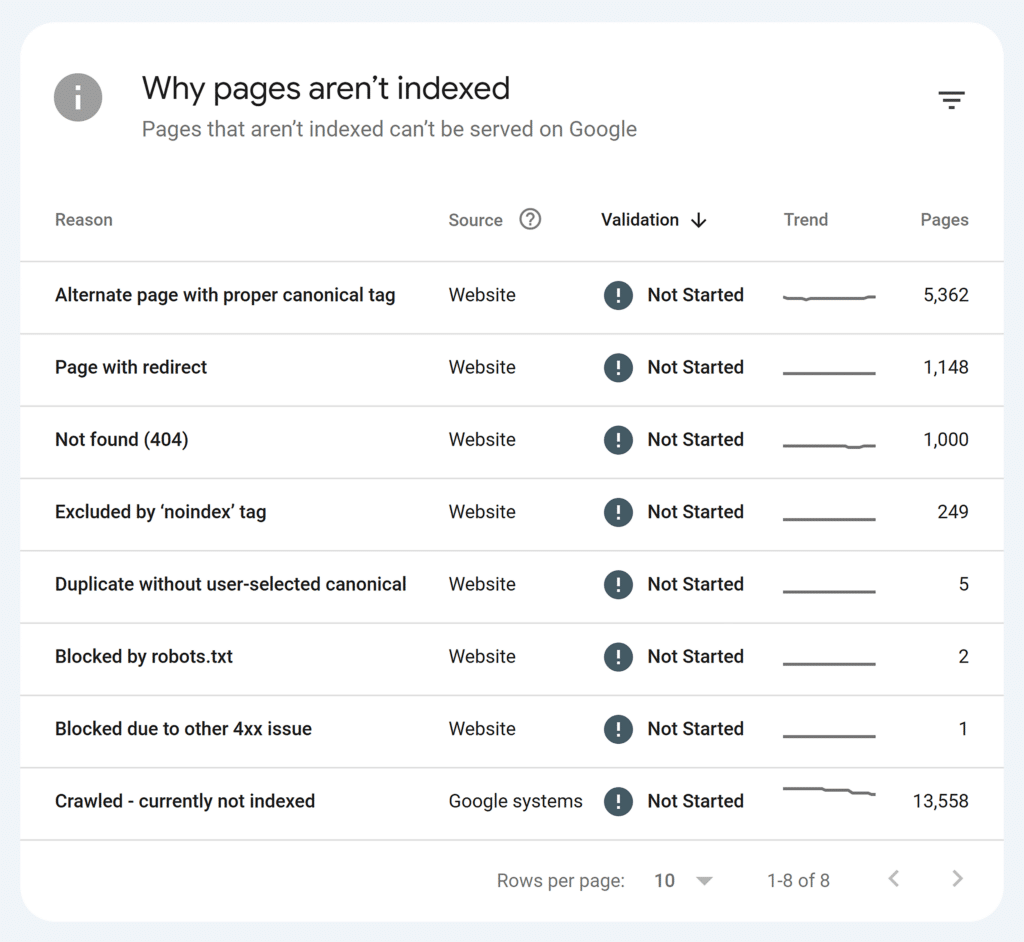
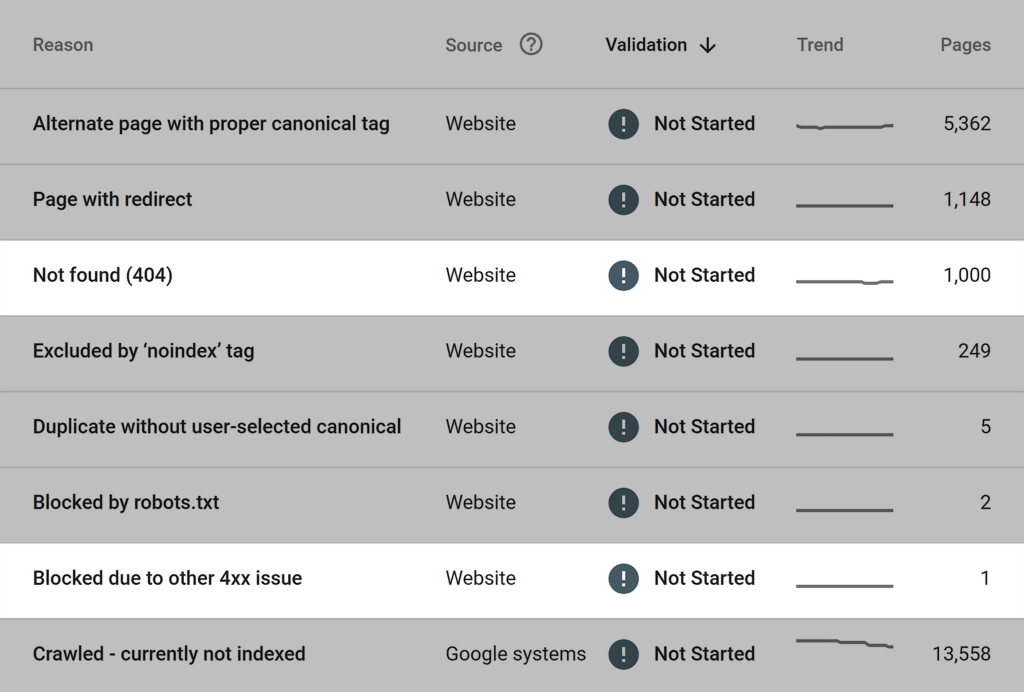
If you have a verified domain property in Google Search Console, you can see all indexed and not indexed pages in the Page indexing report. That’s the most reliable data because Google provides it.
The more you grow your website, the higher the amount of indexed pages on the graph should be.
However, Google can exclude the following pages and files from indexing:
- Images with WebP format (because they aren’t indexed as HTML pages)
- Pages with poor mobile optimization
- Duplicate pages
Therefore, I recommend checking this GSC report weekly to ensure you don’t miss any essential updates.
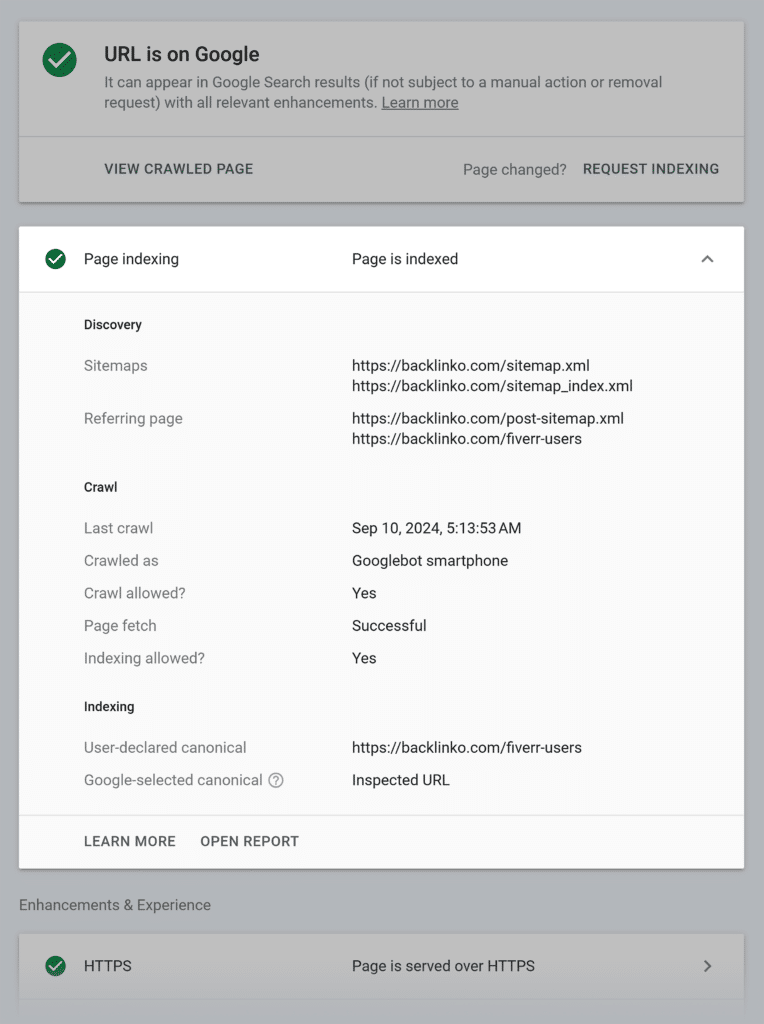
You can also check whether an individual page is indexed using an inspection tool in Google Search Console. I frequently use this to check whether recently published blog posts are added to the index.
Get Your Website Crawled and Indexed
Now comes the most exciting part of this article.
I’ve put together ten essential steps to ensure your website is successfully crawled and indexed.
If you get stuck, check out TTT Academy. It’s home to a private Slack channel with some of the best SEOs on the planet. Chances are high that one of the experts has solved a similar issue!
Step #1: Create an XML Sitemap
XML sitemap is like a roadmap for search engine crawlers, showing what pages of your website should be crawled and indexed.
I’ve come across a controversial statement that a sitemap isn’t necessary since crawlers can find all web pages, given that a site architecture is set up correctly.
It can be true for relatively small websites with a click depth of three. However, what should giant websites with thousands of pages do? Even if you follow a strict internal linking strategy, it won’t guarantee the absence of orphan pages.
You can easily avoid this issue by creating a simple XML sitemap and placing it in the root folder on your website.
First, check if your website already has a sitemap.
You’ll see it under the following link: site.com/sitemap.xml.
Type your URL’s sitemap link into your browser. If your website has a sitemap, you’ll see something like this:
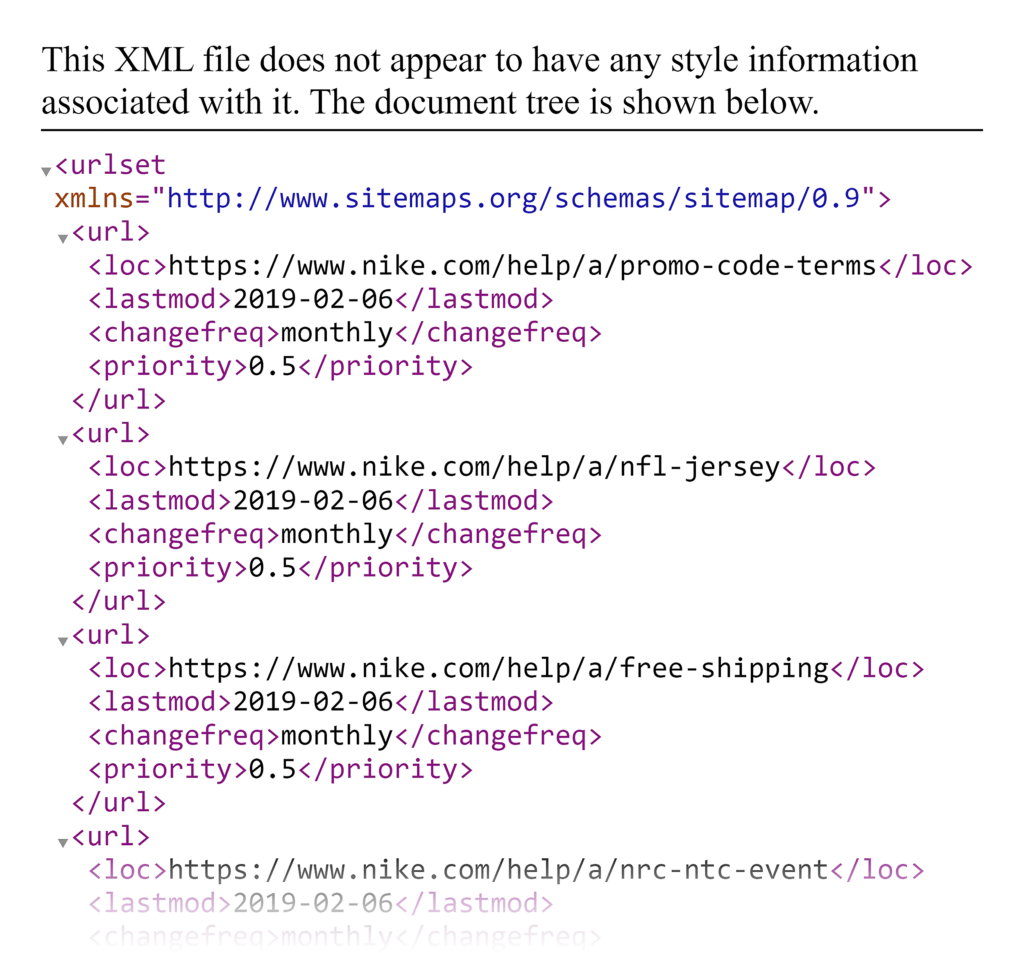
If you don’t find it, this is a critical issue to resolve.
If you’re on WordPress, these SEO plugins will help you create and update a sitemap: Yoast SEO or All-In-One SEO.
Or, you can ask your web developer for help.
Step #2: Create a Robots.txt File
Since many people don’t get the meaning of the robots.txt file (which plays a pretty important role), I’ll try to explain it creatively.
Robots.txt is like a backstage pass to a huge concert hall, which grants and declines access to certain areas. This way, journalists (crawlers) know where they can go and what photos they can take (crawl particular pages).
If there is no backstage pass and the concert hall is open for anyone, journalists can access all areas and photograph everything on the go.
The same will happen to your website if it does not have a robots.txt file — you won’t have control over what’s crawled and indexed on your website. Eventually, you might find admin panels, thank you pages, test servers, and more in the Google index.
If you still don’t have a robots.txt file on your website, you can easily add it using SEO plugins for WordPress. Or you can ask a web developer to place a robots.txt file in the root folder on your website.
Here’s how you can check the robots.txt file on any website: site.com/robots.txt
If you want to dig deeper, Semrush has an in-depth guide on robots.txt and why it’s essential for SEO.
Step #3: View Rendered HTML File
In web development, rendering refers to taking HTML, CSS, and JavaScript code and displaying it as a visually appealing web page that users can interact with.
So, a rendered HTML File is an HTML code of a web page after it has been processed and displayed by a web browser.
Why check a rendered HTML file? Because Google also fetches CSS, Javascript, and multimedia resources while rendering a web page. If something isn’t accessible for Google or returns errors, Google may flag your web pages as non-mobile friendly.
Eventually, your website may lose rankings and organic traffic.
I recommend checking the rendered HTML file to ensure the content and the layout are displayed correctly. This is particularly important after making changes to the HTML, CSS, or JavaScript.
It’s also a good troubleshooting step if you have a page that is not being indexed.
It’s generally sufficient to check the rendered HTML of the affected pages. If you encounter rendering issues, debug the HTML, CSS, or JavaScript code to identify and fix the root cause.
Google has an excellent article about the rendered source of a page if you want to learn more about it.
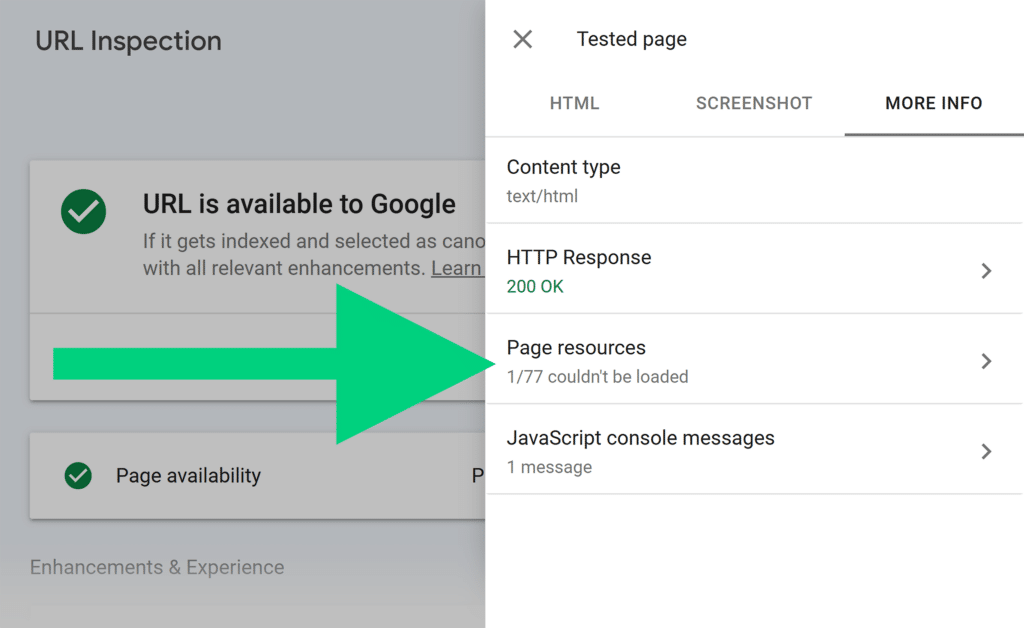
Here is how you can check a rendered HTML file in Google Search Console:
- Inspect your target URL via Google Search Console.
- Click “Test live URL.”
- Click “View tested page.”
The HTML tab will show you the rendered HTML file.
If you navigate to the “More info” tab, you’ll see various page resources that didn’t load for some reason.
Step #4: Check Crawl Logs
If you think your website has crawling issues but couldn’t discover them using the above-described methods, check the crawl logs report.
This method is a bit technical, but Semrush has a great tool to help.
First, you’ll need to download your log files (access.log). To do this, you need to get access to your web server via the File Transfer Protocol (FTP), such as FileZilla. Log files are usually located in the “/logs/” or “/access_log/” folder.
Once you have the log file, retrieve and review its data. The data contained in the log file is regular text so that you can use any text editor.
I recommend using the Semrush Log File Analyzer, which generates detailed and visually appealing reports from your log file.
The analyzer will help you identify server errors, unnecessary redirects, or misconfigured redirects that might be causing your crawlability problems.
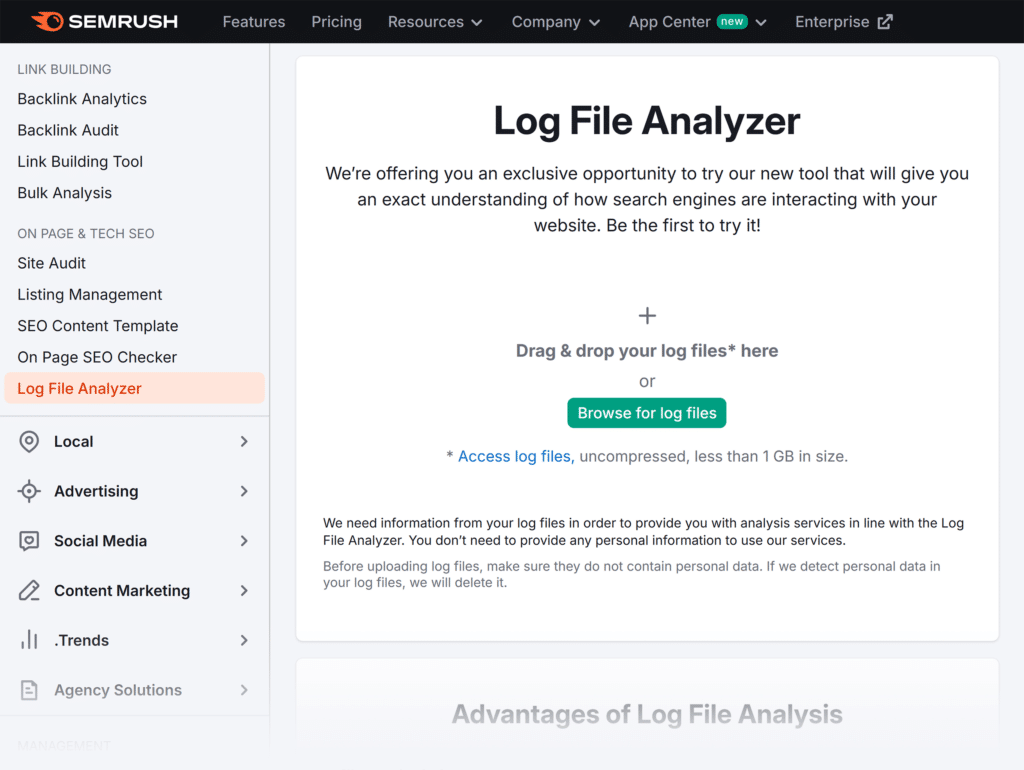
It includes a detailed guide to help you download the log file. You can also contact the Semrush support team for further assistance with log files and data retrieval.
Step #5: Use Canonicals
If your website has internal duplicate content, it will be challenging for Google to define what pages should be indexed and ranked.
Eventually, Google can randomly pick pages for ranking. However, those pages may not be the ones you want Google to index and rank.
Every page on your website should have a self-referencing canonical tag.
This way, you won’t send mixed or wrong signals to Google. Instead, search engine bots will know exactly what pages should be crawled, indexed, and ranked.
If you believe your website has duplicate content, here is a detailed guide about canonicals and how to set them up correctly.
Step #6: Check HTTP Status Requests
Your web pages should return a 200 OK status code every time your web browser (the client) sends a request to the server.
A 200 OK status code means the server received, understood, and accepted the request. So you, as a user, can successfully browse a web page.
On the other hand, the 404 Not Found or 410 Gone status codes indicate the requested resources are unavailable and web pages aren’t accessible to users.
Why is this important?
Displaying 404 or any other 4xx status code can cause Google to drop your rankings and eventually remove your web pages from the index.
That’s why I recommend regularly checking your website HTTP status codes to ensure all essential pages return a 200 OK status.
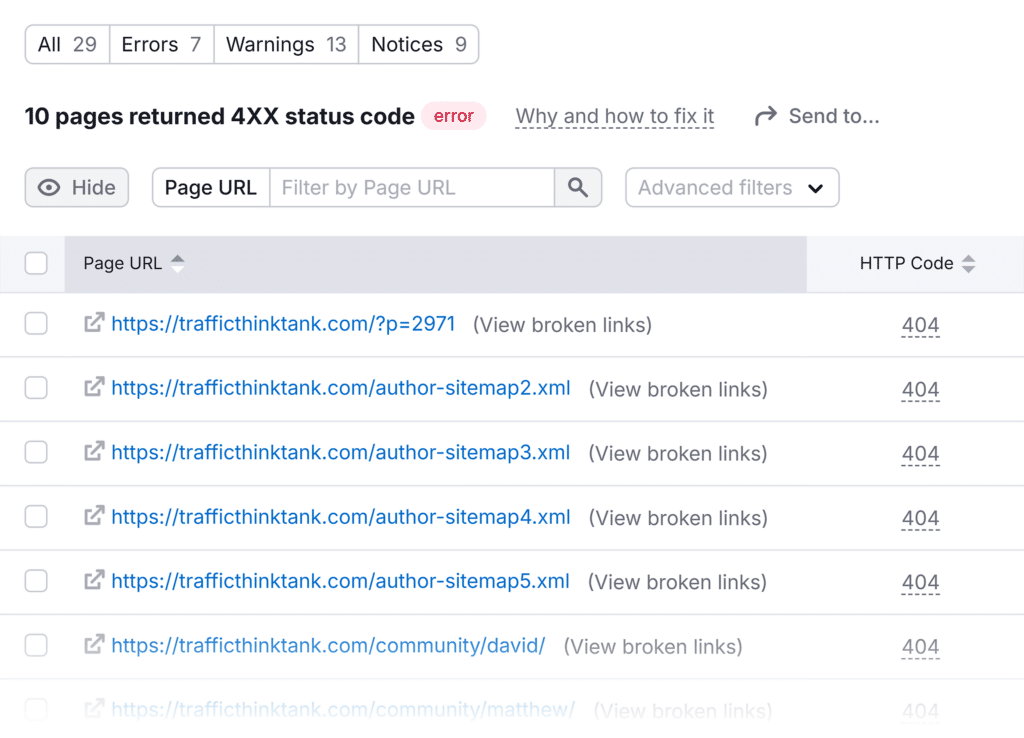
You can check all the technical issues, including 4xx errors, in the Semrush Site Audit report. The tool prioritizes the most critical issues so you’ll know what to handle first.
The Google Search Console Pages report also shows 4xx errors on your website.
I recommend checking this report daily to track your website performance and quickly manage new technical issues.
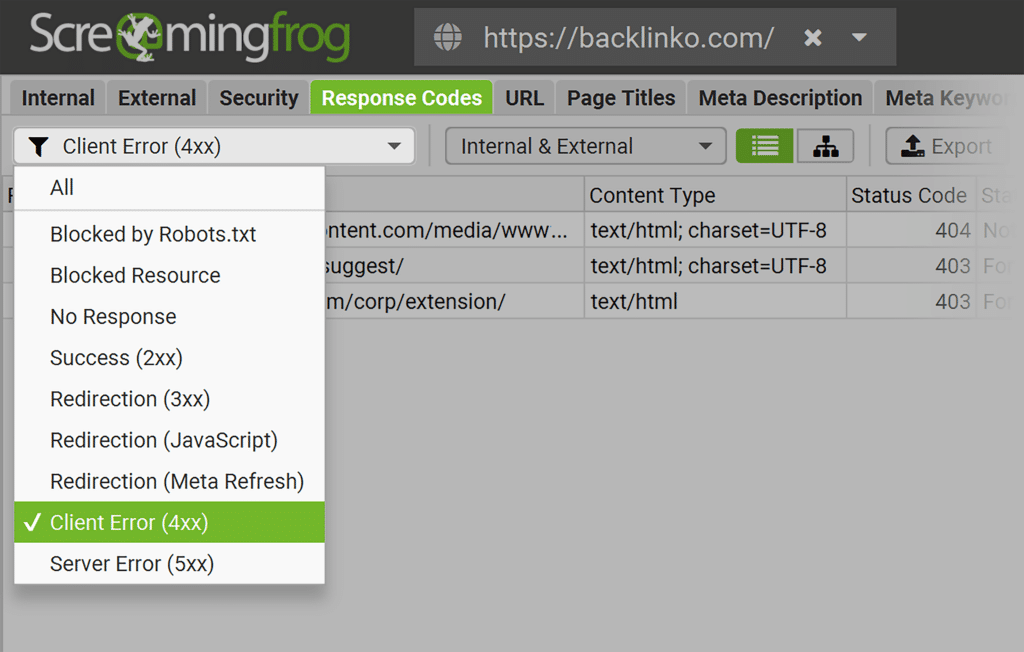
Screaming Frog is another tool you can use to crawl your website and discover HTTP code errors quickly. This feature works even for users with a free plan.
Step #7: Implement Internal Linking
You might have heard that a smart internal linking strategy helps users understand where they are on the website and quickly navigate to the target web page.
However, internal linking isn’t only about user experience.
Internal links pass link juice from one page to another, boosting the organic performance of the target pages (which you will monitor in your SEO reports).
Furthermore, search engine crawlers follow internal links to re-crawl existing pages and crawl new ones. So, you can significantly improve the indexing of your website if your web pages are properly interlinked.
How do you improve internal linking?
The following strategies have proven to work for my SEO clients’ websites. Therefore, I recommend focusing on these two:
- Ensure all related articles, categories, and products are interlinked
- Review the click depth and add related internal links to web pages with the click depth over three
You can use any SEO tool to analyze and fix internal linking issues. However, I recommend using Semrush for its simplicity and powerful toolkit.
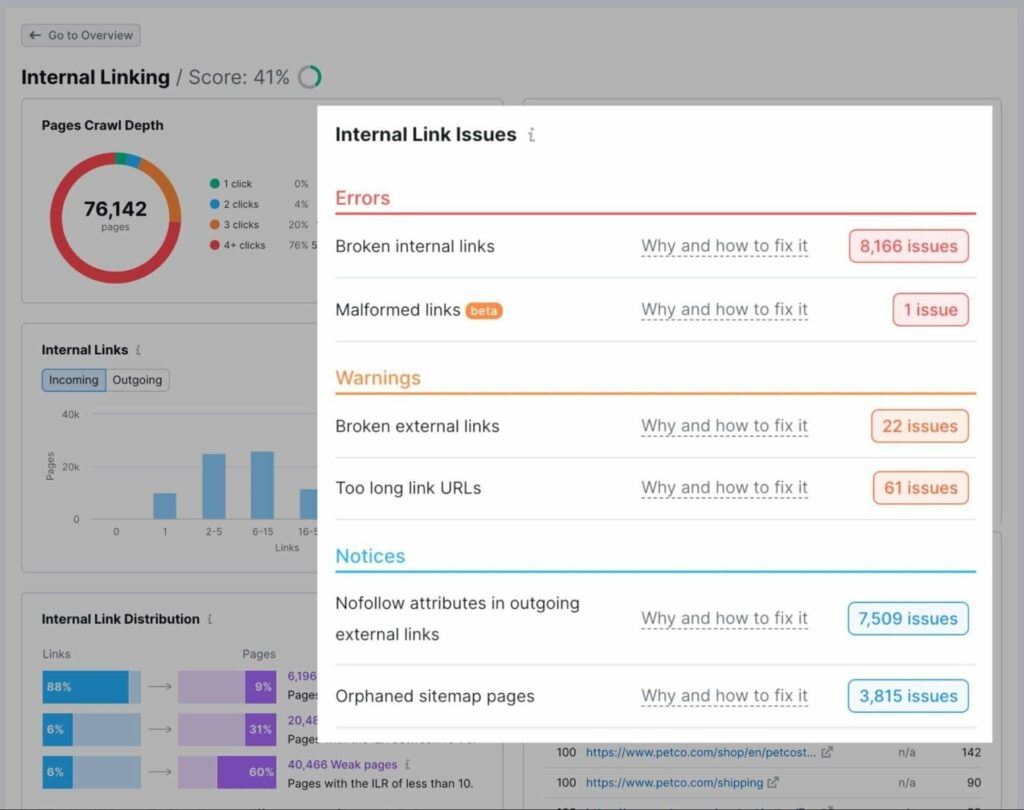
Semrush has a dedicated internal linking report where you can see the click depth for all web pages, the number of incoming and outgoing internal links, and the prioritized list of issues with actionable recommendations.
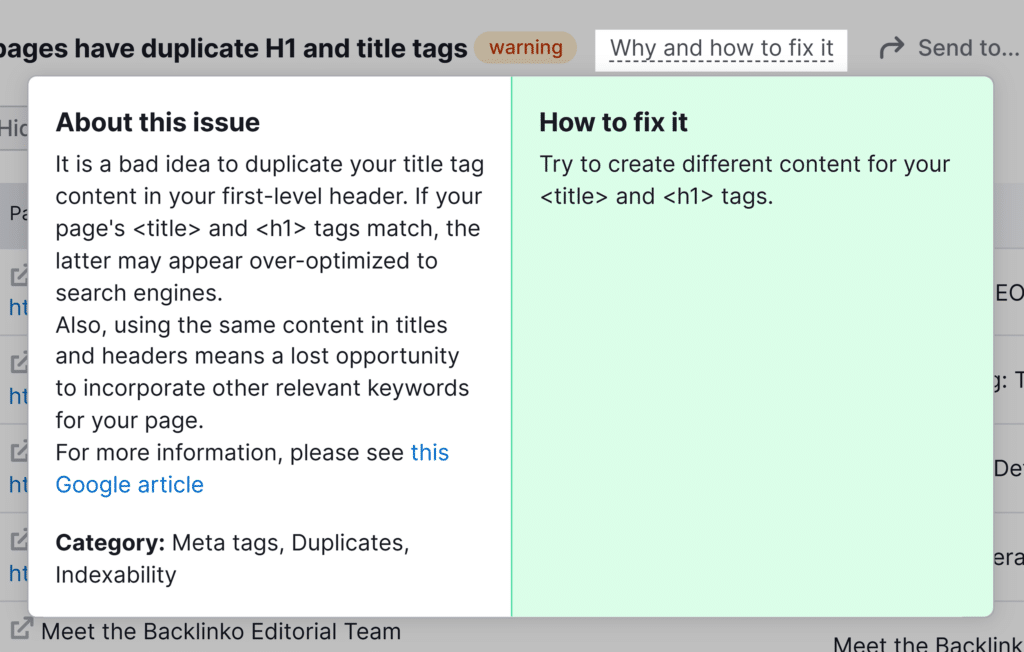
Step #8: Check for Redirect Loops
I once accidentally broke a client’s website by incorrectly editing the .htaccess file. So, I recommend you never edit this file if you’re unsure of the consequences.
Guess what I did wrong to break a website in a few minutes?
I created an endless chain of redirections, preventing the browser from successfully loading the WordPress login page. Simply put, we lost the website access, and no one could log in.
I was particularly afraid of one thing. If the issue with redirect loops wasn’t resolved for a while, Google could downgrade the website’s rankings and eventually remove the previously ranking pages from the index.
I’ve just described a critical scenario where the entire website is gone. However, your website might have internal redirect loops you are unaware of …
Several proven-to-work strategies exist to discover the redirect loops before they harm your website’s rankings.
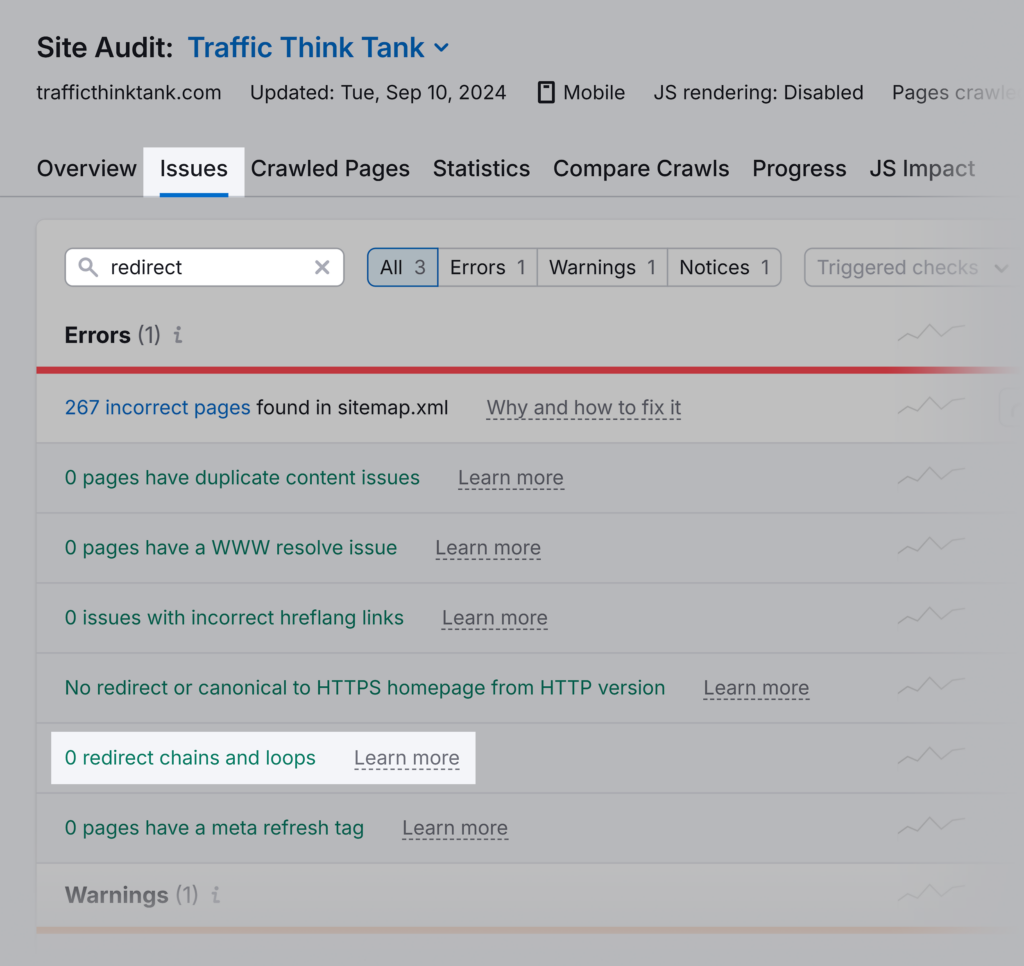
First, you can use Semrush Site Audit to discover and analyze all redirect loops.
The “Why and how to fix it” links in the report will guide you on how to fix these issues.
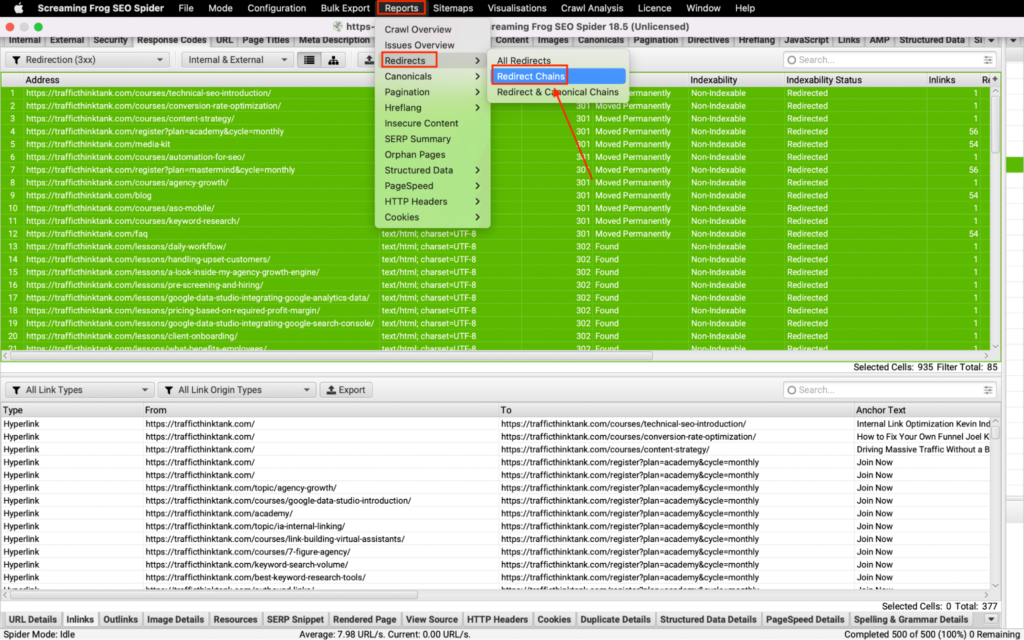
Secondly, you can use the Screaming Frog crawler.
Here’s how to do it:
- Crawl your website using Screaming Frog
- Choose the “Response Code” tab
- Filter by “Redirection (3xx)”
- Select all links by using the Ctr+A combination
- View the source of redirection by choosing the “Inlinks” tab
- Click “Reports” > “Redirects” > “Redirect Chains”
Once you complete all these steps, you can download a CSV file showing you all redirect chains and loops on your website.
Step #9: Check Robots Meta Tags
The meta robots tag instructs search engine crawlers whether they can index and display your website’s content in search results.
The most common directives used in the meta robots tag are “index/no-index” and “follow/no-follow.”
If a web page is open for crawling but has a “no-index” tag, search engine bots will crawl it but won’t add it to the index.
Therefore, use a meta robots tag carefully and ensure the “no-index” tags are removed if they are no longer needed.
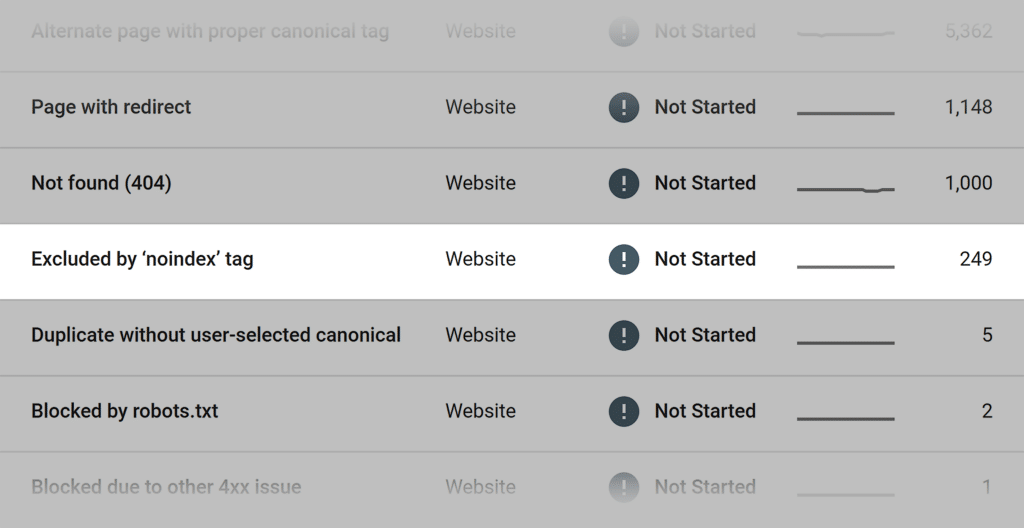
You can check all web pages excluded by the “no-index” tag in your Google Search Console account.
Step #10: Optimize Site Speed
Page loading speed is part of the user experience, which can affect rankings.
Even though the poor page loading speed won’t result in your website’s exclusion from the index, I strongly recommend analyzing all technical errors related to the site speed.
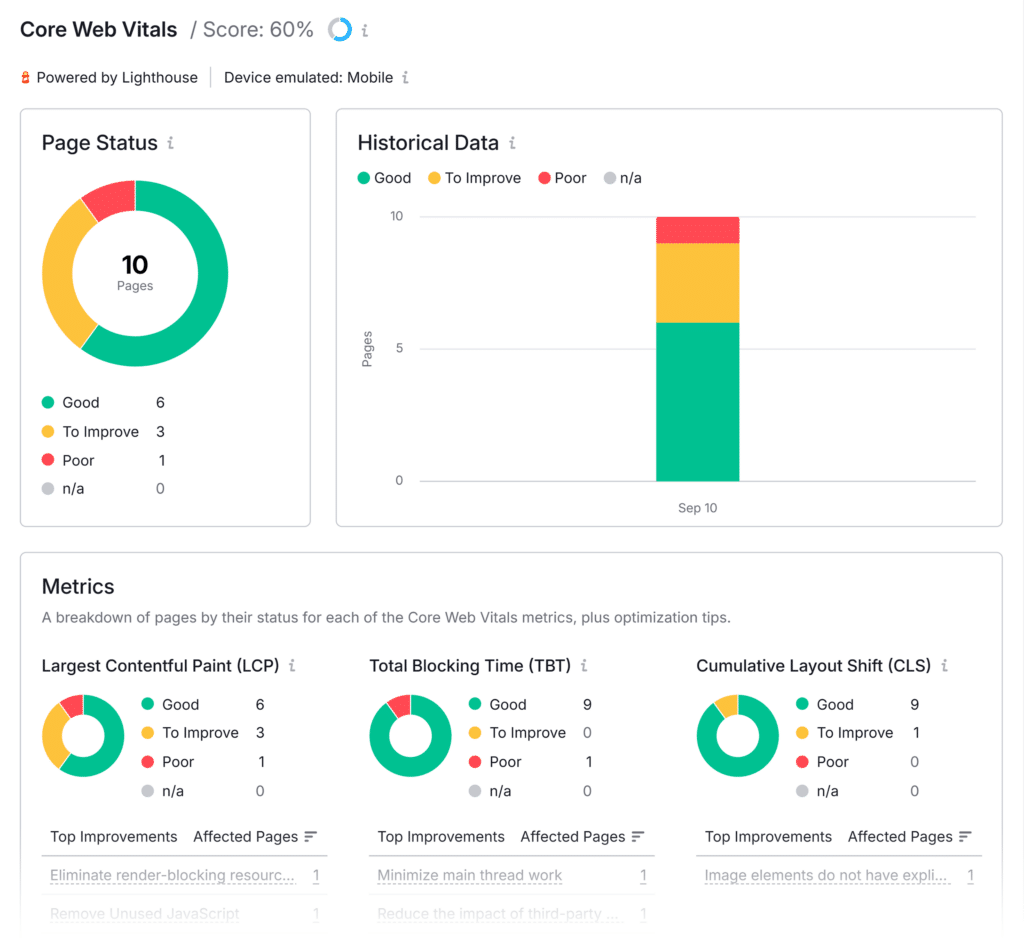
In particular, you should regularly check the Core Web Vitals components, including:
- LCP: Largest Content Paint
- INP (will replace FID in March 2024): Interaction to Next Paint
- CLS: Cumulative Layout Shift
If you have any critical errors on your website, discuss them with your developer and SEO team.
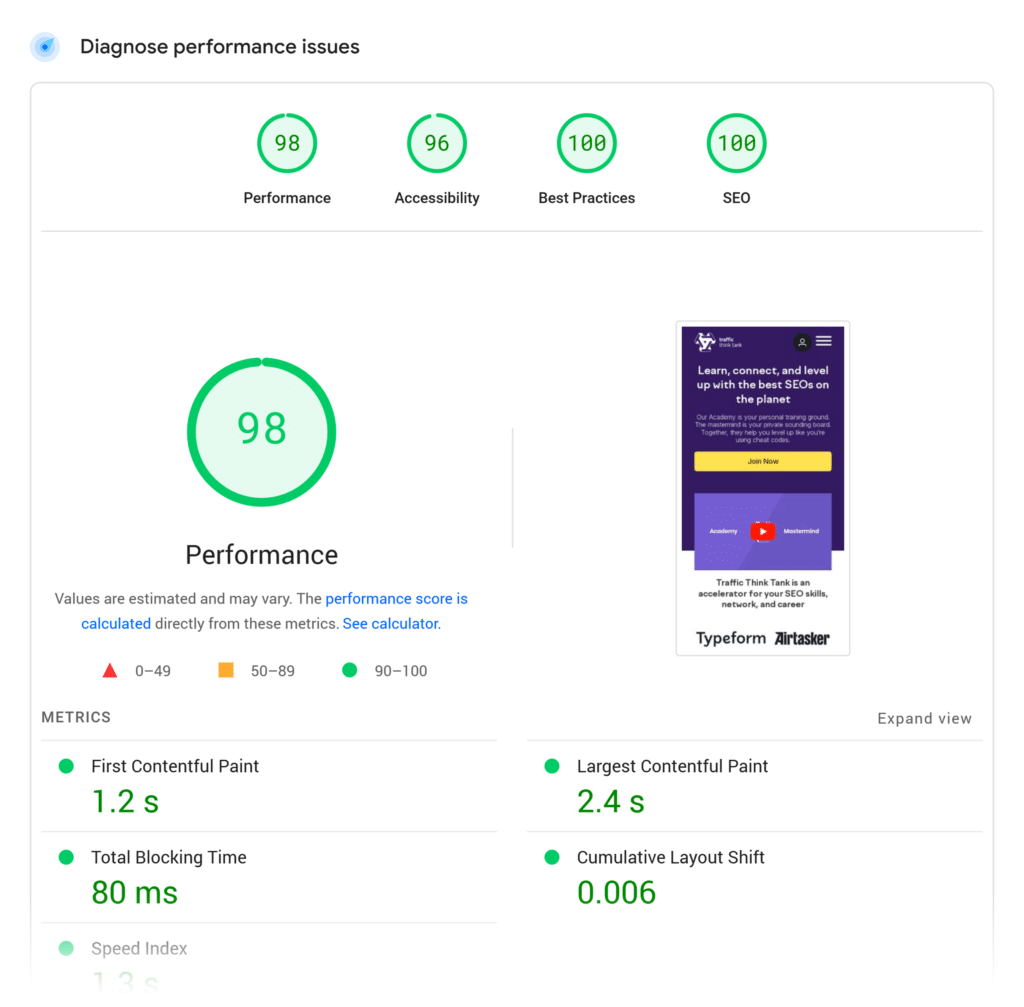
The Page Speed Insights tool developed by Google can update you on the current state of your website and recommend actionable page speed improvements. All you have to do is plug your URL into the search bar and hit “Analyze.”
Ensure you use the reports for mobile since Google has switched to mobile-first indexing.
If you use Semrush Site Audit, check the Core Web Vitals score per page and recommended improvements.
Take the Next Step to Improve Your Website’s Indexability
There you have it: 10 proven steps to ensure your website is properly crawled and indexed.
Now, it’s your turn to take action!
Try Semrush’s Site Audit Tool to find, analyze, and fix technical errors.